Thursday, September 25, 2014

Holla Knits Blog Tour: Knitting Velma

The Holla Knits Blog Tour is stopping by to say hello!


This is the third Holla Knits collection I've been involved with as a test knitter. I was first introduced to Velma (the pattern, that is. I made the cat's acquaintance before this collection) through a sketch that Allyson sent my way. I took one look at the chevron stitch pattern and the unique construction and I was fully on board.

Picking out the yarn was another fun project. Allyson has chosen Knit Picks Wool of the Andes Tweed in the gorgeous Brass Heather colorway, so we knew we knew something darker would be a smart choice. It would show off the versatility of the pattern and hopefully give future knitters a starting point for color inspiration! I've worked with 
Knits in Class yarn before after winning a giveaway a few years ago and I love Kate's colors! We went with Ruby, a beautifully saturated red-purple. Kate even had the graciousness to send it pre-wound! That's some major knitting good karma.

I was so looking forward to getting started, this project practically cast itself on my needles. The chevron stitch pattern was pretty intuitive after an inch or so.
Chevron!

I had planned on being super-diligent about taking progress photos, but I just couldn't stop knitting this thing. The rest of the sweater came together in a flash! I love the seam in the back where the two sides are joined together. It's a slight bit of visual interest and it's somehow makes the sweater lay beautifully. 


That back, tho
Did I mention this thing is crazy flattering? Wearing it makes me feel like one million bucks! I can't wait to see more people cast this baby on - join the Velma revolution, y'all.


Just look how happy I am!
Want to make a Velma of your own? Duh, of course you do. Comment on this post with color ideas for your version and win a free copy of that pattern!

Friday, August 29, 2014

Adler Sew Along - Week 2

It's the best part of any Sew/Knit Along: RESULTS!

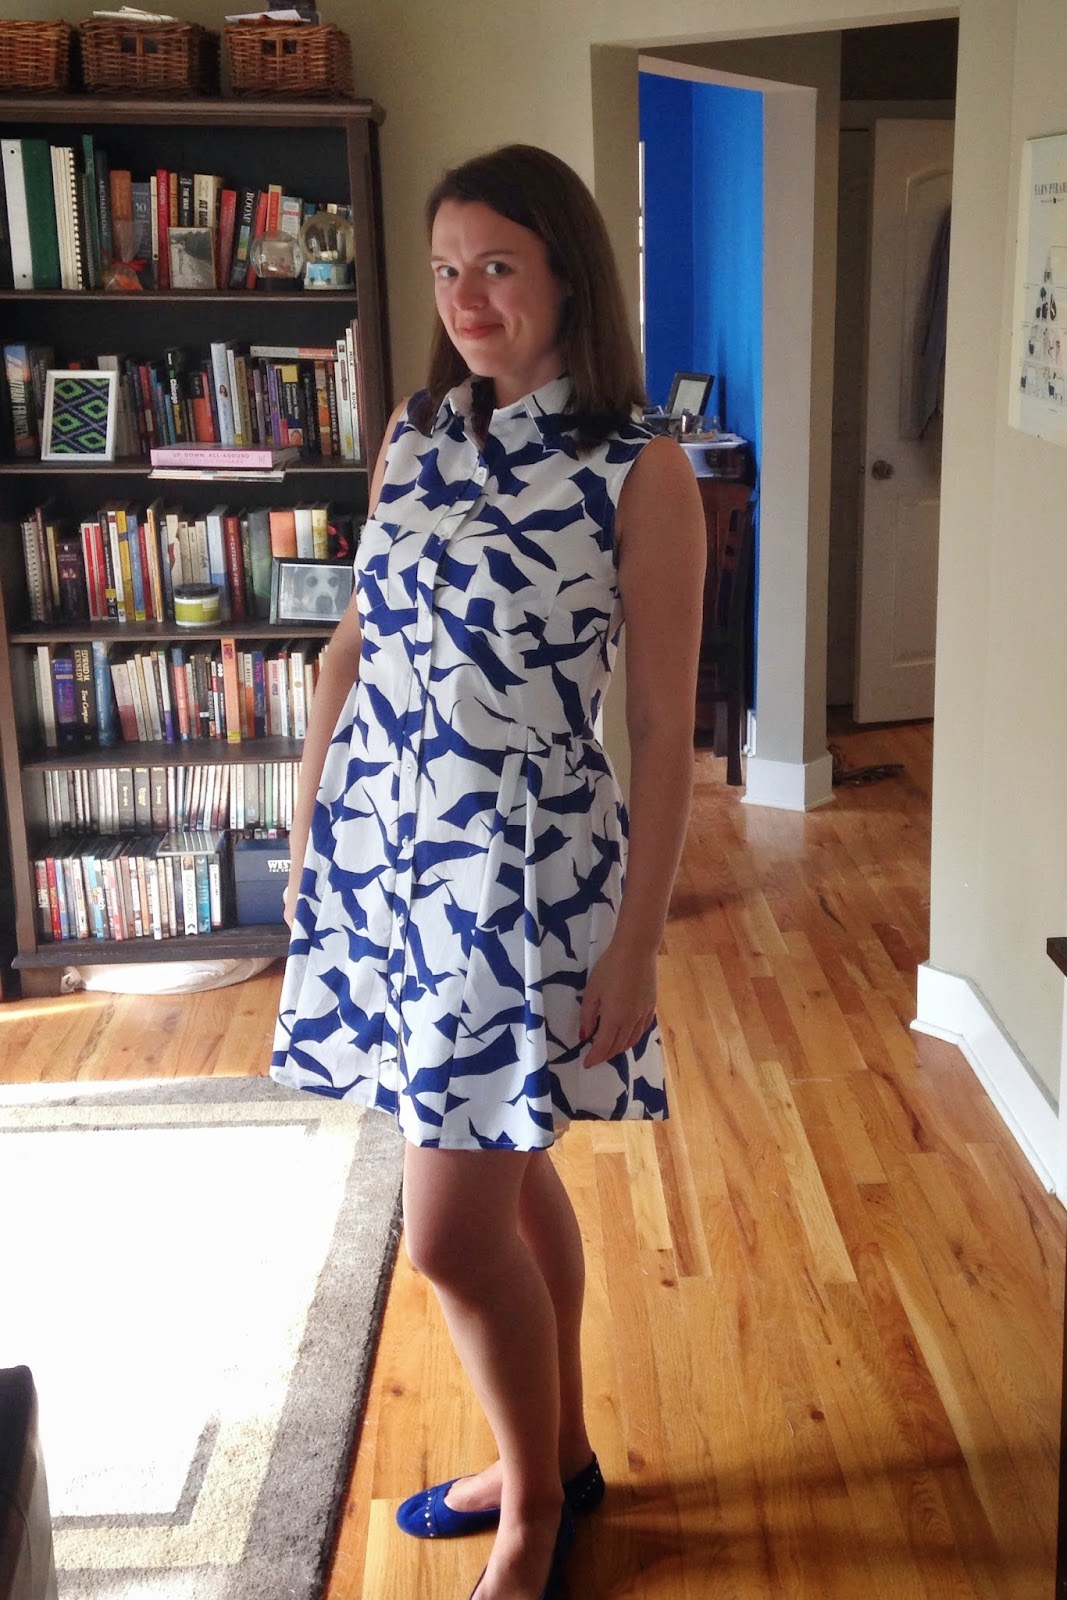
Adler Shirtdress


This was, by far, the most difficult sewing project I've ever tackled. I was glad to have Jen's super-helpful sew along instructions to refer to as I went through the project. Pattern assembly was going well until I got to attaching the collar. Here's a visual representation of how I felt about that process:

"I'm just going to Chippendale it and call it a day"
It was a matter of my brain not understanding the instructions OR the tutorial. This can be a real low point for any crafter. If you can't figure it out from two different resources, you start to panic a little bit. Usually, the best thing to do is to take a break, text your sew-along buddies and get some air. Unfortunately, it was almost midnight on a Wednesday and I really wanted to get through at least the collar and hem before bed.

Fortunately, I had decided to start my annual fall re-watch of my beloved Friday Night Lights. Right when I was about to throw in the proverbial towel, Coach Taylor was there to remind me that football doesn't build character, it reveals it. I wasn't about to let Coach down by giving up! I powered through and somehow got that thing attached after another 30 minutes of muttering to myself.

So, you can thank the Dillon Panthers for this dress, is basically what I'm saying.

"Clear eyes, steady hands, can't lose" - Crafty Night Lights
Droopy = unimpressed


I got a hair cut! Surprise!
In the end, it was worth it. I love how it turned out and can't believe my luck with the fabric choice. I went with Allyson to Kalamazoo, Michigan on a hunt for bargains at the Field's Fabric tent sale earlier this summer and we bought the fabric for this project together. Hers turned out beautifully and, I have to say, so did mine! I've been privy to a sneak preview from Katie, and (spoiler alert) we all pretty much crushed this project. Stay tuned for Katie's progress next week and brace yourself to be super impressed with this trifecta of style and talent. 

Friday, August 22, 2014

Alder Sew Along: Week 1


It's been a sewing-obsessed week for me. The Adler Shirtdress Sew Along is in full swing and it looks like Katie and Allyson are off to a great start!

I've had this project rolling around in my head for a good month now, so I took the time to print the 55 page  (!!) pattern and assemble it last week. Based on my measurements, I selected the Size 10 of the B version and cut out the various pattern pieces.

From there, it's hard to fight the urge to just start sewing, but the fact is: I want to wear this dress, so it makes sense to do what I can to ensure my hard work lasts. That means I washed my fabric in advance, something I do maaaaybe every other project. I was proud of myself, until I realized just how long 4 yards of fabric is and how much ironing it takes to get 100% cotton in reasonable shape.

O, the Ironing
Laying out the pattern pieces was another small challenge. The only space large enough to lay everything nice and flat was the floor. The only other individual who spends time on the floor in this house is my dog Droopy. He remains, as always, as cute as he is unhelpful. 

Hit the bricks, Droopy! We've got a pattern to cut!
Laying out went mostly without incident, although I did find that I needed to flip Pattern Pieces 6 and 13 upside-down to match the layout in the pattern booklet. This felt a little funny, but I trusted the pattern and started cutting.

Tracing Pattern Piece 7 - The Yolk 
Cutting all of the pattern pieces in both fabric and interfacing took a bit longer than I thought it would. There are a lot of components to this dress and it can feel a little overwhelming when you look at them all piled together. You try not to think about the fact that your last project was a baby bonnet for a 1-year-old and that you might be majorly out of your depth and you deploy that time honored strategy: fake it 'til you make it!

In other words: time to dive on in. Remarkably, the actual sewing goes by at quite the rapid pace. You begin with the button bands. I have a weird love of fusible interfacing. It's just so satisfying to iron it into place... PERMANENTLY. 
Buttoned Up

Fun with Fusible Interfacing - working title of my worst selling craft book
And then, it was time for pockets! I've never made visible pockets before, let alone ones that would sit right on my boobs. If done correctly, they should just blend in nicely to the garment. If done poorly, my chest becomes a focal point and I'm just not prepared to deal with that. I'm 30 years old, after all. I demand respect!

Pockets going solo

It's tricky enough to make sure your pockets are lined up with the marking from the pattern, but there's an added challenge with the Adler pattern. Part of the pocket sits on a bust dart, so you're adding pockets to a rounded surface.

Placin' those pockets
Jen at Grainline recommended using a tailor's ham to ensure that your pocket lies smoothly. While that sounds delicious, I don't have this particular piece of equipment. I was able to make due by using the corner of my ironing board and pulling the darted fabric around the edge, which flattened out the fabric. For the most part, I was able to get reasonable placement (after a ton of ironing and accidentally pinning the fabric to my ironing board cover).

Pockets = Placed
Tune in next week, when we add an actual back side to this puppy. Who knows, it might actually start looking like a dress (fingers crossed)!

Tuesday, August 19, 2014

Adler Dress Mini-Sew Along

I've been expanding my hobbies! For Christmas this past year, my family (after years of not-so-subtle hinting) surprised me with a sewing machine of my very own. The delight I felt pretty quickly morphed into a feeling of distinct intimidation. I hadn't touched a sewing machine since 2002. It had been ELEVEN years. Ho boy...

#blessed

I let it sit on the shelf for a few months and worried that I'd never actually put it to good use. Then, I found the perfect pattern that I could use to test my memory and skill level. The Purl Bee Soho Baby Sunbonnet pattern. Anything baby is going to go fast/ not use up too many resources when you forget that tension is a thing or how to properly insert your bobbin... not that I ever did those things. Those would be STUPID things to not know about.........

Anyway, there was success!

This bonnet brought to you by the Partridge Family

And suddenly, I was back in the game. Local Chicago designer Jen at Grainline Studio had captured the attention of crafters I knew primarily as knitters: my friends Allyson and Katie plus other designers I follow like Ysolda Teague were enthusiastic about her design aesthetic. I decided to give her Scout Tee a try.

Thumbs up for SUCCESS

Aside from not being super on point with my sizing, I was really proud to have produced a cute, wearable garment after only hand-sewing buttons since high school. So, why not keep going?!?

Grainline Studio is doing a sew along for its latest pattern The Adler Shirtdress. Because I need a little extra burst of confidence for a more advanced pattern, I'm pleased to announce a Mini-Sew Along with Allyson of Sweatshop of Love and Holla Knits and Katie of Under the Red Umbrella! On Mondays, you can check out Katie's progress. On Wednesdays, Allyson will allow you to peep her sewing game. On Fridays, I'll have all of the chit-chatting about sewing a baller dress that you can stand. It's going to challenging and it's going to be fun.

All My Fabrics

I'm excited, you're excited, they're excited. Gangway for good times!

Monday, July 28, 2014

All You Do Is Win!

A belated congratulations to Knittingdancer and Debbie for winning a FREE copy of Excelsior! E-mail me at doogknits at gmail dot com to claim your prize!

Happy knitting!

Wednesday, July 16, 2014

Holla in the Home

As a crafter, I've never been very free-form. One of the things that appealed to me about knitting when I reached adulthood was the abundance of clear, well-written patterns that could guide me through any technique I was curious about. As a major consumer of patterns over the years, I started to notice little errors here and there that aren't always covered in errata. I think we've all had that feeling when we've read a sentence over and over again, trying to figure out if we just weren't understanding the author or there is an actual misprint.

I know for me, when I go to write something for work or draft a blog post, I feel confident in my ability to communicate. I like to edit as I go and am usually pretty satisfied with the result. But once I send that work to someone else to review, they almost always catch something (sometimes big, sometimes small) that will improve my message. Two sets of eyes are usually better than one.

That's why when Allyson asked me to test knit for the Holla Knits Home Collection, I was excited. When she gave me Excelsior (her newest pattern) to review, I was thrilled. Excelsior is my kind of project. I've never meet fingering weight colorwork I didn't love and I wanted to see how the construction of fabric around glass would come together. Needless to say, I cast on immediately. 


I've been a Holla Knits subscriber from its inception, so I know that Allyson's work is always clear, professional and relatable. The fact that I always have miles of Knit Picks Palette on hand helped me dive into this project right away. As I knit along, I ended up only having two small notes about the pattern - a color square in the chart needed to be flipped and the WS and RS needed to be swapped in the instructions at one point. And for four days of totally enjoyable work, I was finished with my own custom art project! (You can check out the finished project on my Ravelry Project Page. Add it to your faves, why don't ya?)


It just photographs so well, don't you think? I'm always looking for unique gift ideas and now that I know how quickly this project comes together and how expertly the pattern is written, you better believe my friends and family will be sporting some Excelsiors on their walls very soon.


It wouldn't be a proper blog tour without a GIVEAWAY! Leave a comment below to win a free copy of Excelsior for your very own.

And while you're at it, keep up with the rest of the blog tour!

July 7: Launch
July 8: The Sweatshop of Love - pattern giveaway and SEG: Kit
July 9: Jean Chung - pattern giveaway
July 10: Emily Ringleman - SEG: Kit
July 11: Klever Knits - Louet Linen skein of winner’s choice + pattern SEG: 4 skeins CotLin in Canary
July 14: Canary Knits - an amateur's personalized horoscope for one winner
July 15: Louet Blog - pattern giveaway
July 16: OH, SNAP! It's me! - pattern giveaway
July 17: Knits in Class - pattern giveaway

Thursday, October 24, 2013

Blog Hop: Let's Go Colts

It's been a hell of a football season so far and it's only been compounded by the fact that I joined my very first Fantasy league this season. For me personally, it's been going pretty well. My "strategy" of picking Colts past and present plus guys who seemed sound and were still left in the draft has worked out nicely.

But I know beyond a shadow of a doubt, especially after last Sunday's game, that there's only one team for me: the Indianapolis Colts. Luckily, my League is comprised of fellow crafty people who are devoted fans like I am. Today, we're doing a blog hop to celebrate our fandom with crafts of all kinds.

I have friends who are fortunate to go to Colts games on a regular basis and they keep me up to date with the latest in slammin' team gear. Around two seasons ago, I started seeing these amazing gloves with pom poms on the fingertips - and I just couldn't get them out of my head.


Hopefully, you won't be able to either. For this project, you'll need:
1 pair stretch gloves, one size fits all
2 colors of fingering weight yarn (I'm using Knit Picks Palette in White and Celestial)
1 1-inch pom-pom maker
1 pair of sharp scissors
1 tapestry needle

It may seem silly to do a tutorial for a short-cut tool found in any craftstore, but I found the instructions to be kind of difficult to wrap my head around. I spent a few minutes looking at the pom pom maker trying to figure out just what the heck was going on:

Wha?

How does this even?

But here's what I settled on:

Open one side of the pom pom maker, keeping the other side closed for the time being.

Ooooh, got it.

Take the ends of your yarn and wrap them around the the pom maker, like so:


Ready

Steady

Wrap!

Ready, Steady, Wrap would be an amazing public access talk show/ game show about competative gift wrapping. I'd watch! But I digress...

You want to wrap and overlap until the pom maker is pretty full. You can use your own judgement, but the leg should be able to close will still having plenty of yarn to make a fluffy pom pom.

One half completed
Repeat the yarn wrapping on the second side of the pom maker. Close the pom maker and grab your scissors.

Making sure the hinge-side is facing you, start to cut along the middle of the yarn. One of the many bonuses to the store-bought pom pom makers that the scissors can slip into the groove in the middle and keep your cutting steady.
Snip, snip! (sorry my craft scissors are kind of funky, y'all)
Next take about 10-12 inches of one of your colors of yarn:
I chose white because my gloves are white
And get ready to wrap it around the center of the pom by inserting it into the grooves. Note: you can also use thread for this if your yarn isn't super-strong.

Tie a half-knot, wrap the ends around the pom again and tie another knot.

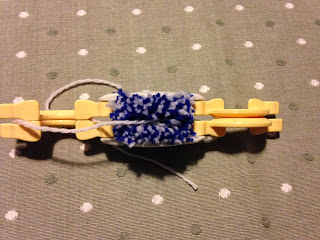
Your pom kind of resembles a confetti-Oreo. Time to remove it an admire your work! Gently pull one of  the sides of the pom maker away from the other to reveal: a pom pom!

TA DA!

Repeat this ten times, one for each finger of the glove. You'll be surprised how addicting pom pom making can get. You'll be done in no time!

Now to make your gloves. Each pom pom should have a pretty significant tail. Thread y our tapestry needle using one of the tails.

With the right side of the gloves facing you, weave your needle in and out of the fingertip-seam of your gloves 2-three times.


Pull your needle through the middle of the pom pom and pull tight. You want the middle of your pom pom to the sitting snugly on the fingertip of your glove. 


Thread your needle through the middle of the pom pom again and wrap it around the base of your pom pom 2-3 times. Tie a knot with the other waste yarn. Trim the excess.


Repeat for each finger and you'll have:


Pom pom gloves! There are so many ways to customize these. Embroider your team name, make more pom poms around your wrists, maybe even try this with mittens - the possibilities for any fan are endless. Best of all, this is simple enough to bang out during the first or second half of any football game you're watching at home.

Unexpected bonus: your dog will FREAK OUT about these. Droopy was mesmerized during assembly. We're a pro pom pom household.
Pom pom hypnosis
Check out the rest of our talented team of craftspeople!